
Building a “revo” kite, by Revomania
This restored Revomania guide walks through the construction of a “revo”-style quad-line kite: paper templates, hot cutting, panel assembly, leading edge, grommets, bridle, end caps, bungees and handles.
If you haven’t chosen your model yet, start with the “revo” plans to pick the size and note the measurements. The sections below preserve Juan Faura’s practical explanations while making the archive easier to read today.
Related Revomania pages
- Need dimensions and diagrams? → “Revo” Plans
- Ready for first flights and figures? → Learn to Fly & STACK Figures
- Project context & credits? → Revomania (main page)
Showing you how to build
Section titled "Showing you how to build"I’ve tried to explain, as simply as possible, how I build a “Revolution”-type quad-line kite.
Whichever model you choose, the build is the same as long as you follow the corresponding measurements.
My only goal is to show you how I make my own revo kites in the simplest and most economical way possible; with time and experience, you’ll build them your own way.
Anatomy of a “revo”
Section titled "Anatomy of a “revo”"How to build a “revo”
Section titled "How to build a “revo”"Building the sail
Section titled "Building the sail"Step 1: Prepare the templates
Section titled "Step 1: Prepare the templates"On paper, draw the corresponding outer dimensions and design the panel layout you want in order to make your templates.
Once cut, transfer them onto the ripstop spinnaker cloth.
REMEMBER: leave a 2 cm seam allowance all around so you can fold a hem and sew.
Step 2: Cut the panels
Section titled "Step 2: Cut the panels"Cut the ripstop with a hot cutter (soldering iron/hot knife) to prevent fraying.
Prepare the Dacron reinforcements for the sail’s triangle tips and the trailing edge.
Step 3: Assemble and sew the panels
Section titled "Step 3: Assemble and sew the panels"First, zig-zag stitch all the inner panels.
Then stitch the full sail together. At the triangle tips and along the trailing edge, insert the Dacron pieces prepared in step 2.
Step 4: Prepare the leading-edge pieces
Section titled "Step 4: Prepare the leading-edge pieces"Step 5: Assemble the leading edge and reinforcements
Section titled "Step 5: Assemble the leading edge and reinforcements"Cut a strip of Dacron and a strip of mesh (screen) to the width required by the model you’re building.
Specialty kite shops usually carry the right widths.
Using pins, stack and hold sail + mesh + Dacron + leading-edge reinforcements, then zig-zag the whole sandwich in a single pass.
With the hot cutter, trim the excess Dacron at the tips.
Step 6: Punch the holes
Section titled "Step 6: Punch the holes"Use the hot tool again and burn 4 mm holes for the end-cap bungees.
Set the grommets in the holes you just made — and your “revo” sail is ready.
Building the bridle
Section titled "Building the bridle"Long bridle (horizontal)
Section titled "Long bridle (horizontal)"The method for the long bridle is the same regardless of model; what changes, of course, are the distances between knots.
Start with the left side and, once finished, use it as the template for the right side.
NOTE: it’s crucial to make the bridles accurately; the kite’s behavior depends on it.
Short bridles (vertical)
Section titled "Short bridles (vertical)"The method for the short bridles is also the same whatever the model; only the distances between knots change.
You need two perfectly identical bridles. Once the first one is done, use it as the guide to make the second.
NOTE: it’s crucial to make the bridles accurately; the kite’s behavior depends on it.
Center bridle
Section titled "Center bridle"Suitable for any “revo” model you build.
Cut the line to length, fold it in half, and tie it to the loop at the center of the long bridle with a square knot.
Assemble the bridles
Section titled "Assemble the bridles"Attach the bridles to the sail
Section titled "Attach the bridles to the sail"Making the end caps (connectors)
Section titled "Making the end caps (connectors)"With a utility knife, cut 4 cm of rubber/silicone tube with an inner diameter that matches your spar.
At 1 cm from the edge, drill perpendicular holes through which the bridles and bungees will pass later.
Fitting the bungees
Section titled "Fitting the bungees"Cut six bungee pieces of about 15 cm each.
On the outer connectors, pass the bungee through the connector hole, then through the grommets, and simply tie a knot at each end big enough that it won’t slip back through the grommet.
On the inner connectors, pass the bungee through the connector hole and feed one strand through the grommet. On the back of the kite, tie a very secure knot with the two strands.
Making the handles
Section titled "Making the handles"Depending on the handle style you want, cut and bend a piece of aluminum tube.
Then drill a small 3 mm hole.
Slide on the grip, which can be rubber, silicone, foam, or any material that feels slightly grippy in hand.
Through the hole in the aluminum, thread a ~20 cm piece of line and tie a knot at the end large enough not to slip back through. Add rubber end plugs for a clean finish.
Finally, tie a series of knots along this leader for adjustments.
Additional build details
Section titled "Additional build details"Side edges
Section titled "Side edges"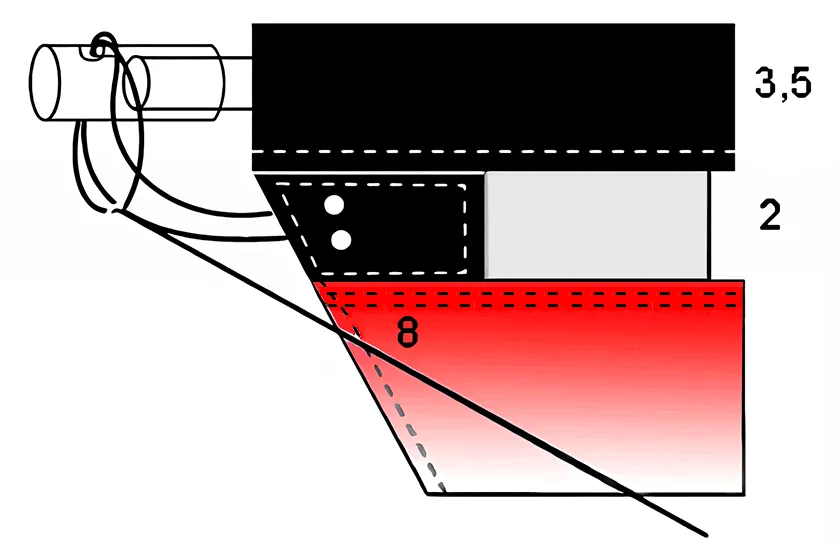
Crossing of leading edge and vertical spars
Section titled "Crossing of leading edge and vertical spars"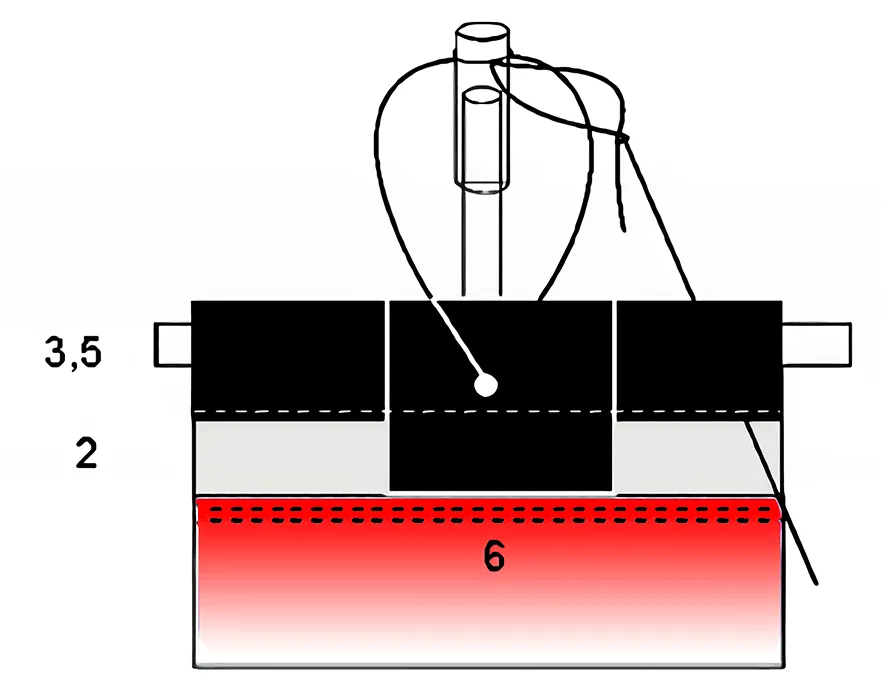
Lower wing tips
Section titled "Lower wing tips"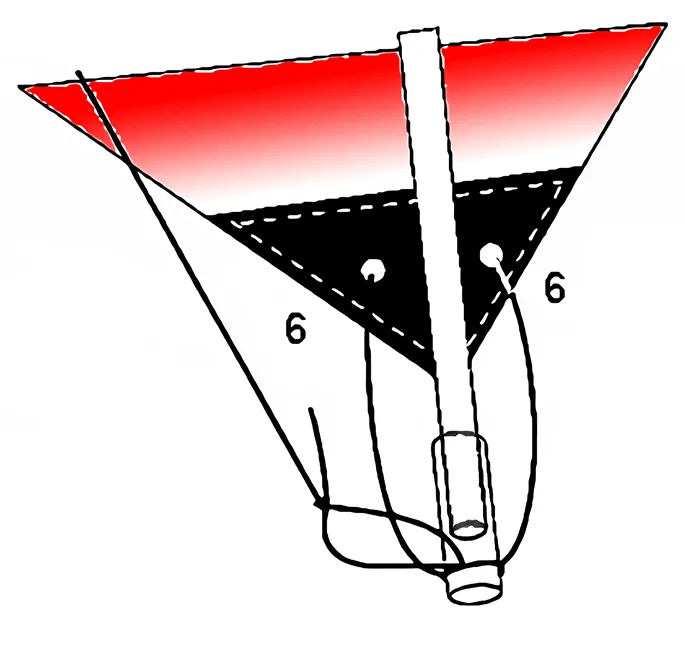
Sail center and leading edge
Section titled "Sail center and leading edge"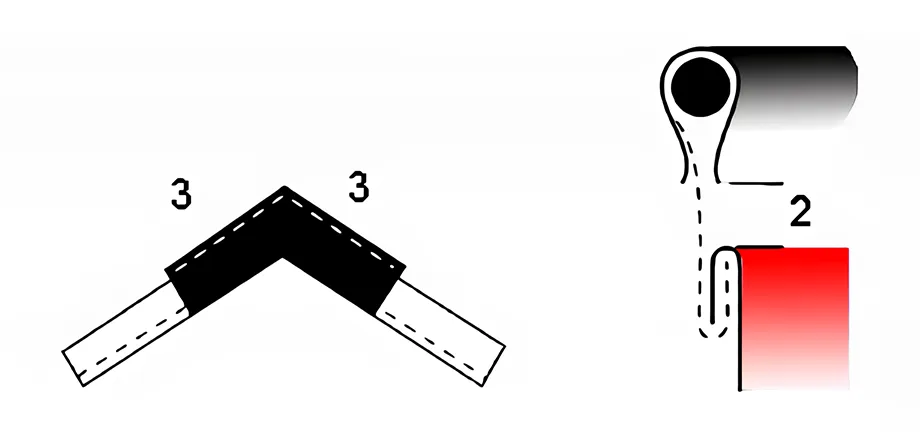
What’s next?
Section titled "What’s next?"- Learn to Fly & STACK Figures — Check bridle symmetry, bungee tension and flat trim, then move on to launches, turns and reverse flight.
- The “revo” plans — Compare sizes (1, 1.5, 2, mini, indoor), wind ranges and feel using the plans to prep your next build.
- Context & credits — This step-by-step comes from the historical Revomania content, restored and translated.
Last updated